 These guides help you configure a Shoutcast stream (version 1 or 2) with your favorite dj software, or a stand-alone encoder like Butt or Nicecast. In most cases, the only info you’ll need are your Radio IP, Port and Password. You’ll find this info in your radio panel, or check your new account email, or login to the Client Area above.
 How To Configure Sam Broadcaster & Shoutcast
Works On: Windows (mac version in development)
Free or Paid: $299 / Fully-functioning, 14-day trial.
Download: SpacialAudio Solutions, LLC – Downloads
This quick guide will help you setup your Shoutcast stream in Sam Broadcaster and broadcast live audio.
Sam Broadcaster is another powerful solution for digital DJs, you can broadcast live or set up an AutoDj.
I’m using a test Shoutcast stream for this setup.
Radio IP: 193.465.485.55, Radio Port: 9943, Radio Password: 95765
You can find your own stream info by logging into your radio panel.
Please Note:
You can use the trial version of Sam to test your stream but you’ll need to purchase Sam after 14 days.
Sam includes it own build-in encoder, making it easy to configure a shoutcast stream and start streaming.
Download the latest version of Sam from the link above, install it on your computer. (use Firebird Edition)
Once you have Sam installed on your computer, start it up and from the top menu select Window > Encoder.
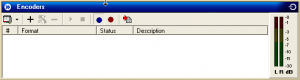
The encoder window is empty,
Click the + to add a new encoder.
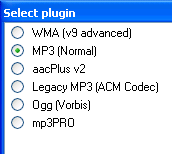
From the Select Plugin window, select MP3 (Normal)
Your stream also supports AAC+ streaming, but for compatible with most media players, use MP3 (Normal)
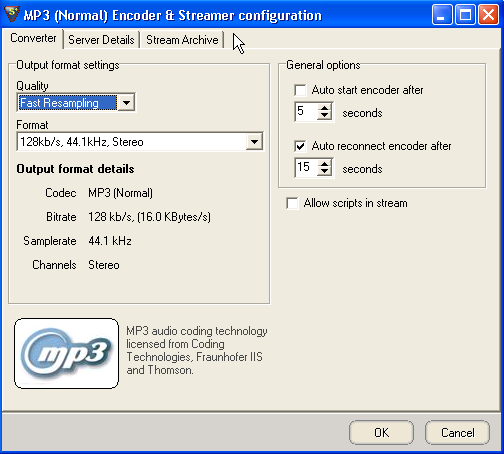
After you select MP3 (normal) a new window will open for Encoder Configuration.
You’ll need your Radio IP, Radio Port and Radio Password.
Check your new account email or login to your radio panel.
At this stage you should have your Shoutcast info ready…
I’m using a test Shoutcast stream for this setup.
Radio IP: 193.465.485.55, Radio Port: 9943, Radio Password: 95765
You can find your own stream info by logging into your radio panel.
The first setting in the Encoder configuration window “Quality” select “Fast Resampling”
For “Format, set this to your stream bit-rate limit, example: 128kb/s 44.1kHz Stereo.
Always let your DJs know you stream bit-rate limit, so the stream doesn’t auto-stop.
Next you need to click the Server Details tab where you’ll enter your stream details.
This is where you’ll enter your Radio IP, Radio Port, Radio Password & other info.
Enter your Radio IP for Server IP, Radio Port for Server Port & Radio Password.
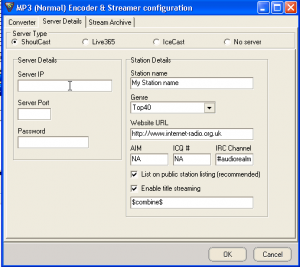
The Station Details section is optional.
Add some info about your radio station.
Click OK when you’re done.
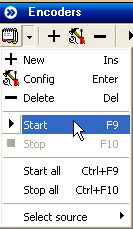
Click Start in the encoder. (or press F9 on your keyboard)
You should see some status info in the Encoder that says you’re connected.
Test Your Live Stream
To test if your stream is live, log in to your Sonic web panel and listen with the built-in web player.
You will see other useful info there, like current listeners, current playing song & last played tracks.
Or you can go directly to Shoutcast Status page for your stream by using your Radio IP & Radio Port.
Example: http://193.465.485.55:9943 in your web browser (use your own stream info for this URL)
If you need more info, check out Spacial Wiki
For support with Sam: Spacial Audio Forum
Congrats! you’re ready to start broadcasting to the world with Sam Broadcaster.
 How To Configure Your Shoutcast Stream With VirtualDJ 8
Works On: Windows / Mac
Free or Paid: $299 / Trial Version
Download: http://www.virtualdj.com/download/index.html
This guide will help you setup your Shoutcast stream in VirtualDJ and broadcast live audio.
VirtualDJ is a popular choice for online DJs and includes a great playlist manager to organize your music.
Please Note:
You’ll need a VirtualDJ Pro license in order to use the broadcast features in VirtualDJ.
VirtualDJ has a build-in encoder that lets you easily connect to a Shoutcast server.
Download the latest VirtualDJ from the link above.
Choose: Typical (recommended for most users)
Run VirtualDJ and when the main screen loads, click the small Settings icon in the top right corner. ![]()
A new popup window will open “VirtualDJ Config.
 VirtualDJ Config Screen
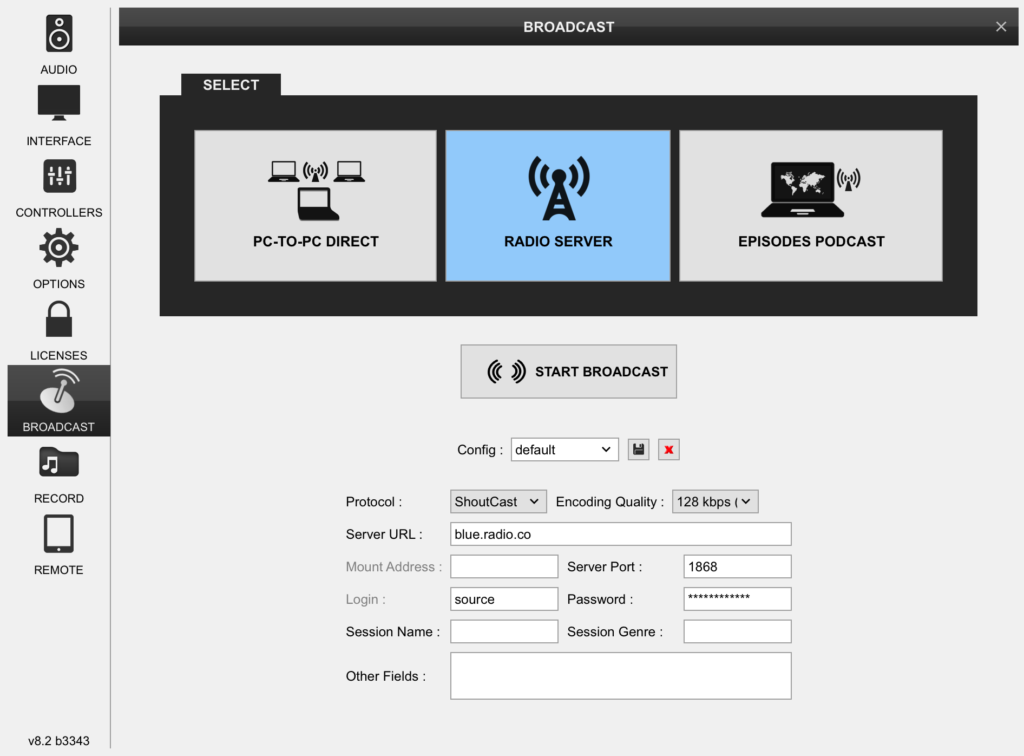
First select the Broadcast tab on the left.
Then select the Radio Server box in the center, under the Broadcast section.
This section is where you’ll enter your shoutcast info and connect your stream.
You will need to find your Radio IP, Radio Port and Radio Password.
At this stage you should have your Shoutcast stream info ready.
We’ll be using a test shoutcast stream for this tutorial.
Radio IP: 193.465.485.55, Radio Port: 9943, Password: 95765.
You need to give your station a name, enter station name in the Config field. (under Start Broadcast button)
Next option, “Protocol” select Shoutcast from the drop-down.
For Encoding Quality set your stream bit-rate limit, usually 192kbps.
For “Server URL” enter your Radio IP.
For Server Port enter your Radio Port.
“Session Name ” you can enter anything, use it for your DJ name or a short note.
“Session Genre” you can enter your music style.
That’s about it, all you have to do now is click the “Start Broadcast” button at the top of the config page.
You will know you’re broadcasting when you see text info displayed beside the Start Broadcast button.
It will display for example: “Broadcasting On 193.465.485.55, Total Time: 0:00:15 & Current Song info.
You can close the Config window now, the encoder will stay connected in the background, you’re live!
Start adding music to your playlist, or drag songs from your computer onto the two virtual turntables.
Test Your Live Stream
To test if your stream is live, log in to your Sonic web panel and listen with the built-in web player.
You will see other useful info there, like current listeners, current playing song & last played tracks.
Or you can go directly to Shoutcast Status page for your stream by using your Radio IP & Radio Port.
Example: http://193.465.485.55:9943 in your web browser (use your own stream info for this URL)
Congrats! You have configured your shoutcast stream with VirtualDJ
 How To Configure Your Shoutcast Stream With Mixxx
Works On: Windows/ Mac/Ubuntu
Free or Paid: Free Software
Download: Mixxx DJ Software
This guide will help you configure your shoutcast stream with Mixxx DJ software and broadcast live audio.
Mixxx is another great piece of software that allows you to stream live music or AutoDJ playlists.
Starting with version 1.9.0, Mixxx directly supports live broadcasting which lets you connect to Shoutcast and Icecast servers. Using the preferences dialogue in Mixxx, you can simply supply all the information needed to establish a server connection. Downloaded Mixxx from the link above, at the end of the installation you’ll be asked to choose a music directory on your computer.
The music directory you choose here will be loaded into Mixxx, you can change this later by going to Options > Preferences > Library. This makes it easy to manage your music files in Mixxx playlist manager, you can drag any audio file onto the two virtual turntables.
Installing Lame MP3 Encoder (libmp3lame)
Next you’ll need to download LAME encoder (libmp3lame.dll)
Lame is needed to record or stream mp3s, Windows & Mac Instructions.
The download page includes a 32-bit and 64-bit versions,
Make sure the version you download matches the version of Mixxx you installed.
Once libmp3lame.dll is downloaded, use Winrar, Winzip or 7Zip to extract the zip file to your desktop.
Double click on the lame folder you just extracted, right click the libmp3lame.dll file and rename it to lame_enc.dll then copy this file. You need to paste the lame_enc.dll into the same folder where you installed Mixxx, “C:Program FilesMixxx” or “C:Program Files (x86)”
Now all you need to do is close Mixxx and restart it,
TIPS: Using Mixxx Short-keys To Start/Stop The Encoder For Live Broadcasting
Mixxx has a lot of Short-keys to quickly access different features, read more about Mixxx Short-keys.
The Short-key we need is “Ctrl + L” This short-key will connect or disconnect the shoutcast encoder.
If you don’t install lame_enc.dll, you’ll get a warning about not being able to record or stream mp3s.
We’ll use Short-key “Ctrl + L” to connect the encoder in Mixxx,
But first you will need to setup your Shoutcast stream info.
Click “Options > Preferences” This will open the Preferences window,
Click the “Live Broadcasting” tab on the left.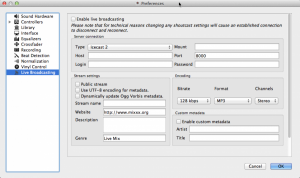 Connecting Your Shoutcast Stream To Mixxx Encoder
Locate your Shoutcast Radio IP, Port and Password.
You’ll find this info in your radio panel or email.
At this stage you should be ready to configure the Live Broadcasting encoder.
We’ll be using a test shoutcast stream for this setup:
Radio IP: 193.465.485.55, Radio Port: 9943, Radio Password: 95765.
The first option in the Preferences window is “Enable Live Broadcasting” you can tick this box.
For “Type” select “Shoutcast”
For “Mount” leave it empty.
For “Host” enter your Radio IP Example: 193.465.485.55
For “Port” enter your Radio Port.
For “Login” enter “admin”
For “Password” enter your Radio Password.
Stream Settings
You can tick “Public Stream” if you want your stream listed on the Shoutcast.com radio directory.
By default all Dreamstream Shoutcast streams are listed as public streams on Shoutcast directory.
Leave UTF-8 encoding for metadata & Dynamically update Ogg Vorbis metadata unticked for now.
Optional Info: Stream Name, Website, Description & Genre, enter some info about your station.
Encoder Settings
Make sure to enter your stream bit-rate limit, and always let your DJs know your bit-rate limit.
If someone goes over your bit-rate limit, the server stops the streams until the admin restarts it.
You can find your bit-rate stream limit in the Sonic panel, on the right under My Account section.
Bitrate: 128kbps,
Format: Mp3,
Channels: Stereo.
You can enable the Custom Metadata option if you want to enter some info about an artist or song.
That’s it! you’re done setting up your Shoutcast stream, click OK to close the Preferences window.
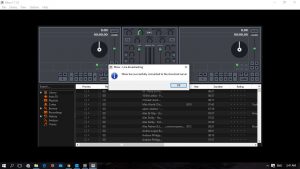
The very last step, got back to Mixxx, use the Shout-key “Ctrl + L” to connect the encoder in Mixxx.
A new window will pop up letting you know that the encoder is connected to the shoutcast server.
Test Your Live Stream
To test if your stream is live, log in to your Sonic web panel and listen with the built-in web player.
You will see other useful info there, like current listeners, current playing song & last played tracks.
Or you can go directly to Shoutcast Status page for your stream by using your Radio IP & Radio Port.
Example: http://193.465.485.55:9943 in your web browser (use your own stream info for this URL)
Congrats!
If you followed this guide, you’ve learnt how to setup Mixxx, install the LAME encoder, configure the encoder,
Setup your first playlist, and use Short-keys to automatically connect the encoder to your Shoutcast stream.
 How To Configure Your Shoutcast Stream With RadioDJ
Works On: Windows
Free or Paid: Free software
Download: RadioDJ Radio Automation Software – Downloads
This quick guide will help you setup your Shoutcast stream in RadioDJ and broadcast live audio.
RadioDJ is one of the most advanced radio automation programs and it’s available free of charge.
RadioDJ doesn’t have a build-in encoder, you can install 3rd-party plugins and connect to a shoutcast server.
Download the latest RadioDJ from the link above, extract the zip file with a program like WinRar or Winzip.
You’ll also need to download the Altacast encoder plugin from Altacast (Scroll down to RadioDJ Plugins)
RadioDJ 1.8.2 Install
Once RadioDJ is downloaded, extract the zip file with WinRar or Winzip and you’ll be left with the RadioDJ folder.
There is no installer, when you extract the zip file, you will get the RadioDJ folder, move the RadioDJ folder to C:RadioDJ.
This is the best location for RadioDJ, because in many cases, on systems with security settings set too high, the windows
system will prevent RadioDJ from accessing its files.
Ok, so your RadioDJ folder is now located at C:/RadioDJ. RadioDJ needs a MySQL database to operate,
The database stores all the data about your tracks, rotations, playlists, events.
For this purpose, we’ll need to install MySQL Server, a free database server that can be downloaded from here.
So your next step is going to be: Install The MySQL Server.
A short video tutorial about installing the MySQL Server can be seen here: How To Install MySQL Server
After reading / watching “How to Install MySQL Server” your MySQL Server should be up and running.
Now go back to RadioDJ folder at “C:RadioDJ” locate the “Setup” folder and open “Database Setup.exe”
This utility will create the database for you and allows you to do database related tasks like backup or restore.
Here’s another short video about using this utility: How To Install RadioDJ Database
If you created the database successfully, you can now close “Database Setup.exe”
Start “RadioDJ.exe” from C:RadioDJ (Create a desktop shortcut for RadioDJ)
You should check RadioDJ settings and make sure they are right for your needs.
For this, go to Options (bottom menu) and again, Options in the new window.
One important setting to check, is the Album Art folder.
Make sure that it points to a existing folder, otherwise you could get some errors when importing your audio files. After you’ve customized the settings, proceed to Categories, you can find them in main window Options->Categories. Make sure each categories has at least 1 sub-category, tracks are imported to sub-categories and not main categories. When you’re done, you can import your audio files to the proper categories/subcategories/genres.
For this operation, go to Options->Directory Import or Track Import (if you need to import your files one by one). Please be careful when assigning the track types to your audio files! Most of the track types have different behavior. Track Types In RadioDJ When the import process has ended, the next step is to build your first rotation.
Go to Options->Tracks Rotation.
From your categories, you can add to the list categories/subcategories/genres and the generated playlist by AutoDJ will follow that format.
When you’re done with the rotation, in the main window, activate the AutoDJ and a playlist will be generated based on your rotation.
That’s almost! it for the RadioDJ setup, you even learned how to install the MySQL database! and use an AutoDJ.
One last step! We need to install AltaCast Encoder Plugin in RadioDJ and configure your Shoutcast stream.
Extract the AltaCast Encoder zip file with WinRar or Winzip, open the folder and go into root > plugins folder.
Copy Plugin_Encoder.dll and Plugin_Encoder.xml and paste them into RadioDJ Plugins folder
“C:RadioDJPlugins”
Restart RadioDJ, you should now see the option for AltaCast in the top menu.
Go to: Options>Plugins>Highlight Altacast> Settings> Place it into a zone.
Zone 2 or 3 will suffice. (You cannot place it into Zone 1 as that’s where the main playlist lives)
Click the AltaCast button in RadioDJ, then click the green + symbol to add a new encoder.
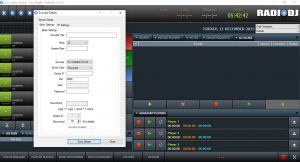
This opens new window called Encoder Details.
You will need to find your Radio IP, Radio Port and Radio Password.
Check your account setup email or log in and check your Sonic panel.
Once logged in to Sonic panel you’ll see your stream info on the right.
At this stage you should have your Shoutcast stream info ready.
We’ll be using a test shoutcast stream for this setup:
Radio IP: 193.465.485.55, Radio Port: 9943, Radio Password: 95765.
Encoder Name: Give the encoder a unique name. Select bit-rate:
This will be whatever bit-rate your Shoutcast/Icecast server is set to receive.
Samplerate: This will be either 22050 or 44100 depending on the bit-rate you’re streaming at.
Encoder type: Here you have four options: mp3, AAC+, Ogg Vorbis, Opus.
Please note:
Ogg Vorbis and Opus only work with Icecast V2 servers. Server Type: Either Icecast, Shoutcast or Shoutcast V2.
Server IP: This will be the Radio IP for your shoutcast stream. (E.G 179.234.678.234)
Server Port: This will be the Radio Port number for your shoutcast stream (E.G 8000)
Server Password: The Radio Password for your shoutcast stream.
Mountpoint: This is generally used with Icecast servers (E.G /stream.mp3)
Stream ID: This is used for Shoutcast V2.
Reconnect Seconds: This is the amount of time in seconds the encoder will attempt to reconnect after a disconnection.
Click save stream and if you have your configuration settings correct the encoder should be streaming within seconds.
N.B: You have to manually start the encoders on their first run.
If you should have any issues installing this plugin help can be found Here
Please Note:
There have been reports of some users having issues with the Altacast plugin.
Should your connection suffer the slightest packet loss or network dropout between
your PC and your streaming server it may cause the Altacast plugin to freeze RadioDJ briefly.
It’s a known problem and the developer of Altacast will get it sorted when he is able to devote time to the project.
At the moment “Life” seems to be getting in the way of him being able to develop it any further.
The best way around it is to use Standalone encoding software
You may also get better results using the other RadioDJ Streaming Plugin written by the guy who codes RadioDJ.
Test Your Live Stream
To test if your stream is live, log in to your Sonic web panel and listen with the built-in web player.
You will see other useful info there, like current listeners, current playing song & last played tracks.
Or you can go directly to Shoutcast Status page for your stream by using your Radio IP & Radio Port.
Example: http://193.465.485.55:9943 in your web browser (use your own stream info for this URL)
Congrats! you’re ready to start broadcasting live music and AutoDJ playlists from your computer.
 How To Configure Your Shoutcast Stream With Nicecast
Works On: Mac
Free or Paid:
Free Trial / Purchase License Key For Full Version Download: Nicecast
Nicecast is a stand-alone program that lets you broadcast live audio from your Mac to your online listeners.
This quick guide will help you configure your Shoutcast stream with Nicecast and broadcast live audio online.
When connected, Nicecast will listen to your sound-card for any audio, and stream it live to a shoutcast server and out to your listeners. You could play music from an external source, your computer or iTunes library, Nicecast will pick up the audio source and broadcast it. If you use the trial version, noise is overlaid on any broadcast longer than 60 minutes, to unlock the full version, purchase a license key. You can use the free version of Nicecast for this tutorial, if it doesn’t work for you, then you’re not wasting your money.
Once you have Nicecast on your apple mac computer, run Nicecast and select “Window” from the top menu, then select “Show Server” This will bring up the Server window which allows you to enter your Shoutcast stream details and connect to a Shoutcast server.
You’ll need your Radio IP, Radio Port and Radio Password, check your account setup email or log in and check your Sonic panel. Once logged in to your Sonic panel, you’ll see your stream info on the right. At this stage you should have your Shoutcast info ready.
I’m using a test Shoutcast stream for this guide:
Radio IP: 193.465.485.55, Radio Port: 9943, Radio Password: 95765.
 If you’ve used Nicecast previously for another Shoutcast server, you’ll need to add a new server to the list in the Servers window.
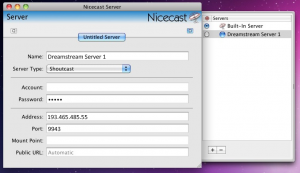
Click the small + sign in the Servers window to add a new server. A new window will open called “Nicecast Server”
This is where you’ll enter your Shoutcast details.
In the first field “Name” enter anything you like, enter a name for your Shoutcast station.
Server Type: Select Shoutcast from the drop-down, works with Shoutcast Version 1 or 2.
Next go down to “Address” and enter your Radio IP, example: 193.465.485.55 (no spaces)
Enter your Radio Port for the “Port” field, example: 9943 (no spaces)
Next go back up to the “Password” field, enter your Radio Password.
Make sure you enter this info correctly, without spaces or the stream won’t connect.
 Once you’re done with the above settings,
In the Servers window, select your new server.
Enable the small blue bubble in front of your new server.
Before you can connect and start streaming live, you’ll need to fill in some other info for your Shoutcast stream.
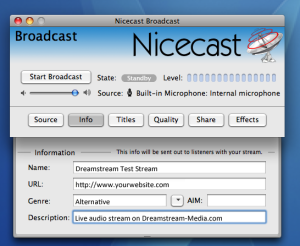 In the Nicecast Broadcast window, click on the Info button.
You will enter some info about your Shoutcast radio here.
To avoid any issues with Nicecast, please fill in all fields.
Enter some info for Name, URL, Genre and Description.
Name: Enter anything you like, a name for your stream.
URL: Enter an URL for your website or radio web page.
Genre: Enter a music genre: Example: Alternative, rock.
Description: Write a short description about your stream.
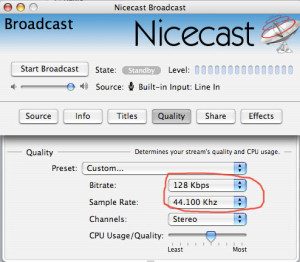 Next you need to configure stream quality, click the Quality button. This is where you’ll set the stream Bit-rate and Sample Rate for your stream. You’ll find the Bit-rate limit in your welcome email or your web panel. Log in to your Sonic panel, your bit-rate limit is displayed on the right.
If your Bit-rate limit is 128 kbps, select 128 kbps.
For Sample Rate just leave it set to 44.100 khz.
Always let your DJs know your stream Bit-rate limit, Dreamstream servers use Bit-rate control features to avoid Bit-rate abuse. If someone goes over their Bit-rate limit the stream stops and needs a restart.
That’s it for Nicecast configuration, if you followed these steps, Nicecast is set up correctly.
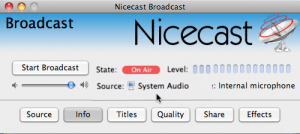 Next, click the Start Broadcast button,
You’ll see some status info in Nicecast, On-Air indication.
Test Your Live Stream
To test if your stream is live, log in to your Sonic web panel and listen with the built-in web player.
You will see other useful info there, like current listeners, current playing song & last played tracks.
Or you can go directly to Shoutcast Status page for your stream by using your Radio IP & Radio Port.
Example: http://193.465.485.55:9943 in your web browser (use your own stream info for this URL)
Congrats!
You have configured Nicecast to broadcast live audio, from any source, to a Shoutcast server.
 How To Configure Your Shoutcast Stream With EDCast
Works On: Windows
Free or Paid: Free
Download: Edcast
This quick guide will help you configure your shoutcast stream with Edcast and broadcast live audio on the web. Edcast is a stand-alone program that lets you broadcast live audio from your computer to your online listeners. When connected, Edcast listens to your sound-card for any audio source, and stream it live to a shoutcast server and out to your listeners. You could be playing music from an external source into your computer, listening to music on your computer, Edcast will stream it live.
Step 1. Install Edcast Download Edcast Standalone from the link above and install it on your computer.
Edcast can be used for broadcasting live audio to an Icecast or Shoutcast server.
You could also use Edcast to re-stream an AM/FM radio station over the internet.
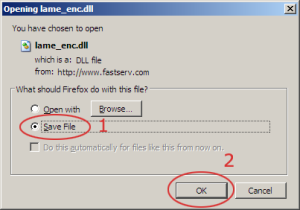
Step 2. Install LAME MP3 Encoder
You’ll also need the LAME MP3 Encoder dll file, this is required so Edcast can stream mp3 files.
Download: LAME MP3 Encoder DLL
Right click the link above and save the lame_enc.dll inside the folder where your installed Edcast.
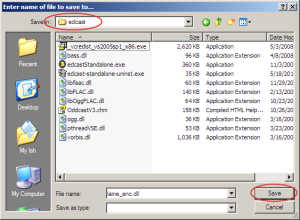 It is very important that you save this file in the actual Edcast program folder.
Navigate to ‘C: Program Files edcast’ and click ‘Save’.
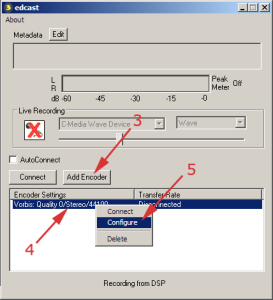
Step 3. Start Edcast & Configure The Encoder Settings
- (3) Click the ‘Add Encoder’ button
- (4) Right-click the new encoder that appears below it
- (5) Choose ‘Configure’ from the menu that appears
In the ‘Basic Settings’ section, set up the encoder.
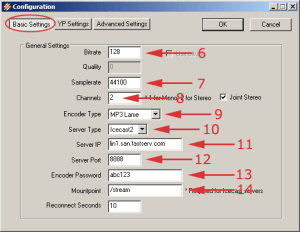
- (6) Enter your chosen bitrate – this must be equal or lower than the rate you purchased.
- (7) Enter your samplerate – Enter 44100 for bitrates above 96, or 22050 for streams below 96.
- (8) Number of channels – Enter 2 for bitrates above 48, choose 1 for bitrates below 48.
- (9) Select the ‘MP3 Lame’ encoder
- (10) Select ‘Icecast2’ for Icecast server, or ‘Shoutcast’ for Shoutcast server.
- (11) Enter the host name of your server.
- (12) Enter the port number of your server.
- (13) Enter the DJ or Admin password of your server.
- (14) (Icecast2 only) Enter the mount point ( /stream by default ) for Fast Serv Icecast2 servers.
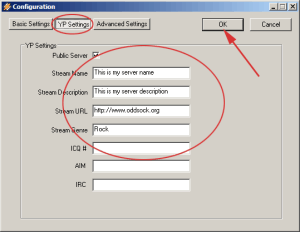
In the ‘YP Settings’ section, enter your station details.
Enter a short description for your station.
Enter your website or radio website URL.
Enter some music genres for your station.
Click OK when you’re done.
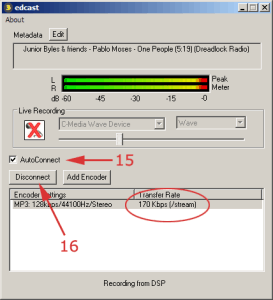
Step 5. Start Edcast Encoder
- (15) Tick the ‘AutoReconnect’ box
- (16) Hilite the new encoder, then click the ‘Connect’ button
- You should see information about the encoder status in the ‘Transfer Rate’ column.
If it’s working properly, a numeric value will appear indicating the transmission speed.
Notes:
- If you are unable to connect, go back to step 4 and double check every server setting.
You must also make sure there is music playing in Winamp or whatever media player you’re using. - You can then select the audio device you wish to capture audio from – select it under ‘Live Recording’.
Test Your Live Stream
To test if your stream is live, log in to your Sonic web panel and listen with the built-in web player.
You will see other useful info there, like current listeners, current playing song & last played tracks.
Or you can go directly to Shoutcast Status page for your stream by using your Radio IP & Radio Port.
Example: http://193.465.485.55:9943 in your web browser (use your own stream info for this URL)
 How To Configure Your Shoutcast Stream With Butt Broadcaster
Works On: Windows, Nac, Linux
Free or Paid: Free
Download: Butt Broadcaster
This quick guide will help you configure your shoutcast stream with BUTT Broadcaster and broadcast live audio on the web. Butt is a stand-alone program that lets you broadcast live audio from your computer to your online listeners. When connected, Butt listens to your sound-card for any audio source, and stream it live to a shoutcast server and out to your listeners. You could play music from an external source connected to your computer, Butt will encode the audio source.
BUTT Broadcast is a free stand-alone encoder program that can stream live audio from your microphone, line input, or sound card to an Icecast, Steamcast, or SHOUTcast server. Butt runs on Windows, Mac and Linux.
Butt is easy to configure, you just add a new server and enter the IP, port and password from your Shoutcast stream and save it. Then click the play button to connect and Butt will start streaming your audio.
Step 1. Download Butt Standalone from the link above and install it on your computer.
In OS X, mount the program by double-clicking the file and dropping it in your application folder.
In Windows, double-click the setup.exe file to run the installer.
For more comprehensive installation guides, click here.
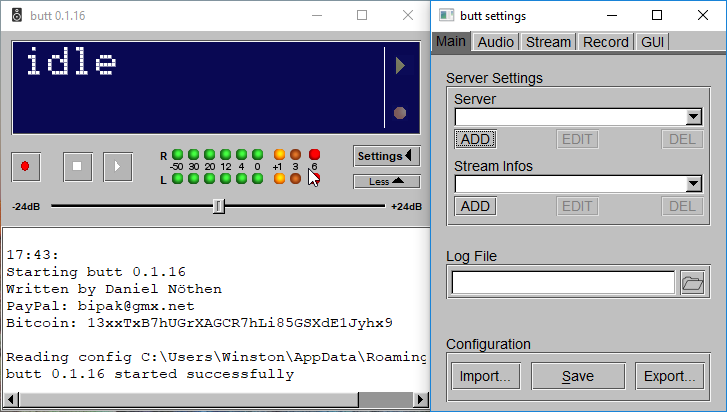
Step 2. Run BUTT and click on the Settings button, a popup window called Butt Settings will open.
This is where you’ll add a server.
Click the ADD button, under the Server input box.
Step 3. Next, you’ll configure the new server you just added by entering your stream info. (Radio IP, Port & Password, Stream) If you’re using an Icecast stream, you’ll need to enter Mount point & Username.
Find your stream info in your new account email or login to your radio panel, or the client area above.
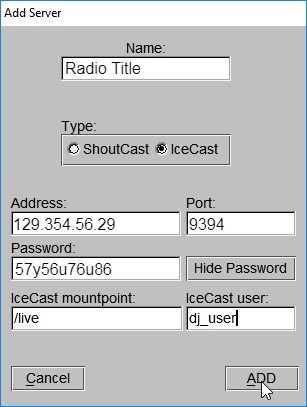
For Icecast & Steamcast
This guide assumes you are using a Centova Cast stream (Icecast)
The stream info below is just an example
Type: Icecast
Address: e.g. 129.354.56.29
Port: e.g. 9394
Password: e.g. 57y56u76u86
IceCast mountpoint: /live
IceCast user: e.g. dj_user
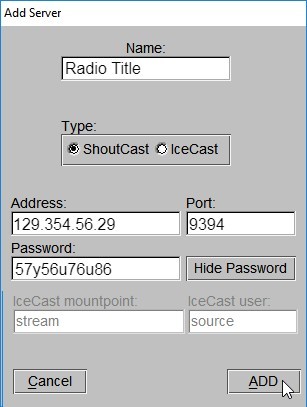
For Shoutcast Version 1 & 2
This guide assumes you are using a Centova Cast stream (Shoutcast)
The stream info below is just an example
Type: Shoutcast
Address: e.g. 129.354.56.29
Port: e.g. 9394
Password: e.g. 57y56u76u86
Icecast MountPoint and Icecast User are not used for Shoutcast setup.
Audio Settings
The ‘Audio tab,’ allows you to configure your audio output. Click the ‘Audio Device’ input box to set the source. You can stream audio from your sound card, or from a microphone. Under ‘Streaming,’ set the bitrate and codec. For this tutorial, let’s set the bitrate at 128 kbps, and use MP3 as our format. Make sure you don’t set the bitrate higher than the bitrate limit provided with your stream.
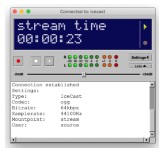
Click the play icon in the BUTT main panel. If it connects successful, the status changes from ‘connecting’ to ‘stream time’ as shown below.
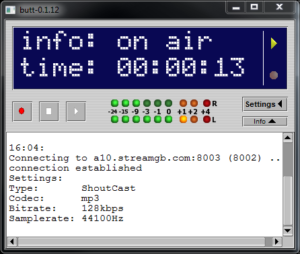
You should now see in your console dashboard that you are connected.
Test Your Live Stream
To test if your stream is live, log in to your Sonic web panel and listen with the built-in web player.
You will see other useful info there, like current listeners, current playing song & last played tracks.
Or you can go directly to Shoutcast Status page for your stream by using your Radio IP & Radio Port.
Example: http://193.465.485.55:9943 in your web browser (use your own stream info for this URL)